AC repair service
AC Shifting: What to Do Before You Move House
Moving house and need to shift your AC? A step-by-step guide covering uninstallation, transport, reinstallation, what can go wrong, and how to avoid common mistakes.
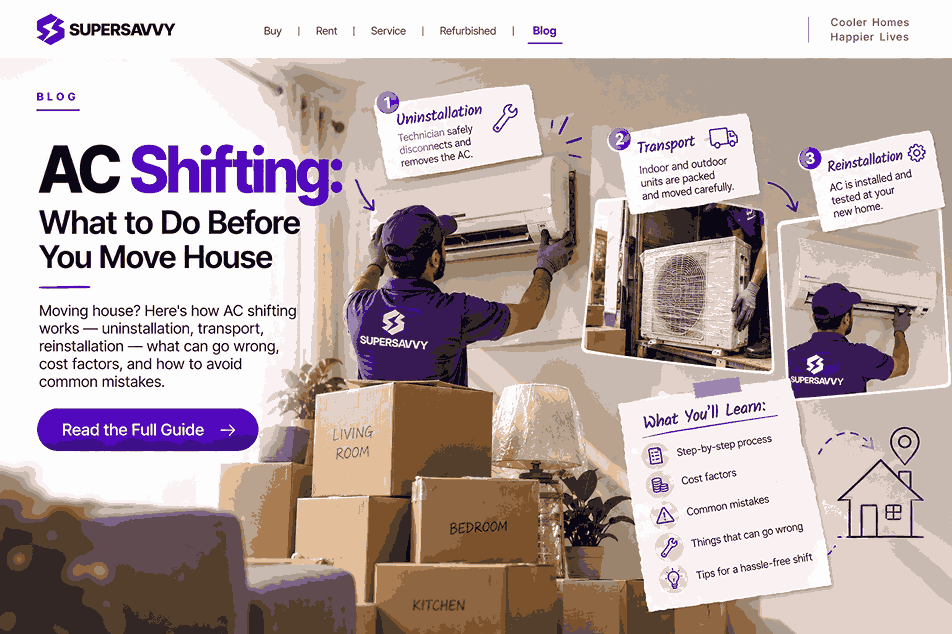
AC Shifting: What to Do Before You Move House
Moving to a new home usually means shifting your AC too. Unlike most appliances, an air conditioner can’t simply be unplugged and carried — it needs a controlled disconnection, careful transport and proper reinstallation. Done badly, you risk gas leaks, damaged copper pipes, or a compressor that won’t start at the new location. Done right, the same AC runs just as well in your next home.
Here’s what the process involves, what to prepare and what to watch out for.
What “AC shifting” actually means
AC shifting is not one job — it’s three:
Uninstallation at the current location (gas recovery, disconnection, removal of indoor and outdoor units).
Transport to the new location (both units, plus copper piping if reusable).
Reinstallation at the new location (mounting, piping, electrical, gas check, testing).
Each step needs a trained technician. The uninstallation especially requires proper gas recovery (“pump down”) to save the refrigerant — skipping this means you’ll need a full gas recharge at the new location, which adds to the cost.
Before the move: what to prepare
1. Get the AC serviced first
A service visit before shifting is worth the cost. Clean filters, a clear drain line and a checked gas level mean you start fresh at the new location. If there’s an existing issue (low gas, a slow leak, a noisy fan motor), it’s cheaper to fix it before uninstallation than to discover it after reinstallation. See what a standard AC service covers to know what to expect.
2. Check the new location
Before the technician arrives to reinstall, verify these at your new home:
Wall space for the indoor unit. The indoor unit needs a clear wall section with enough height from the ceiling (typically 15–20 cm) and no obstructions on either side.
Outdoor unit placement. The outdoor unit needs a stable, ventilated spot — a wall bracket, balcony floor or ground-level platform. Make sure the location allows adequate airflow around the unit and is accessible for future servicing.
Piping distance. The copper pipe run between indoor and outdoor units has a practical limit (usually 15–20 metres for residential split ACs, but shorter is better for efficiency). Measure the approximate distance at your new home. If it’s significantly different from your current setup, you may need new piping.
Power supply. Check that the new room has a dedicated power socket or MCB for the AC. Running an AC on a shared circuit can trip the breaker.
Drainage. The indoor unit produces condensate that drains through a pipe. Make sure there’s a drainage path at the new location — either to an outside wall or a floor drain.
3. Book a professional shifting service
AC shifting is not a DIY job. The gas recovery, pipe handling and electrical work all need trained hands. Hiring someone without experience risks damaging the compressor (from improper gas handling), kinking the copper pipes, or creating a loose electrical connection at the new location.
During the move: what the technician does
Uninstallation (at your current home)
Gas recovery (pump down). The technician runs the AC in cooling mode while closing the liquid-line valve on the outdoor unit. This pumps the refrigerant back into the compressor and condenser. Once the pressure drops, the gas-line valve is closed, trapping all the gas inside the outdoor unit. This step is critical — it preserves the refrigerant so you don’t need a full recharge.
Disconnect pipes and wiring. The copper pipes connecting the indoor and outdoor units are disconnected at the flare joints. The electrical control cable between the units is also disconnected. Both pipe ends are sealed immediately to keep moisture and debris out of the system.
Remove the units. The indoor unit is lifted off its mounting plate, and the plate is removed from the wall. The outdoor unit is unbolted from its bracket. Both units and the bracket are set aside for packing.
Transport
The outdoor unit must be transported upright — tilting or laying it on its side can cause compressor oil to flow into the refrigerant lines, which can damage the compressor on restart.
Copper pipes should be coiled gently, not bent sharply. Kinked pipes restrict refrigerant flow and often can’t be straightened properly — they need to be replaced.
Wrap the indoor unit to protect the fins and body panel from dents.
Reinstallation (at your new home)
Mount the bracket and indoor plate. The outdoor bracket is fixed to the wall or placed on a platform. The indoor mounting plate is levelled and drilled into the wall.
Run the piping. Copper pipes are connected between the indoor and outdoor units. If the old piping is too short or damaged, new piping is installed. The drain pipe is routed to the drainage point.
Electrical connections. The control cable between units is connected. The power cable is plugged in or hardwired to the isolator.
Vacuum and leak test. The technician vacuums the piping to remove moisture and air, then checks for leaks at the flare joints. If the pump-down was done properly, the existing gas is released from the outdoor unit. If there’s a pressure drop or the gas was not recovered, a recharge is needed.
Test run. The AC is turned on and checked for normal cooling, airflow, drainage and any unusual sounds.
What can go wrong
Most AC shifting problems come from shortcuts during uninstallation or careless transport:
Gas leak. If the pump-down is incomplete or the pipe ends aren’t sealed properly, refrigerant escapes. You’ll need a full gas recharge at the new location — an avoidable cost.
Kinked copper pipes. Bending the pipes too sharply during removal or transport creates kinks that restrict flow. Kinked pipes usually need replacement.
Compressor damage. Transporting the outdoor unit on its side can displace compressor oil. If the AC is started immediately, the compressor runs without lubrication. Let the unit sit upright for at least 2–3 hours before the first power-on at the new location.
Loose flare joints. If the flare connections aren’t tightened correctly during reinstallation, they develop slow leaks that show up weeks later as reduced cooling.
Drain issues. If the indoor unit isn’t levelled properly at the new location, condensate pools inside and eventually leaks into the room.
AC shifting charges: what to expect
AC shifting charges are typically the sum of uninstallation and reinstallation costs. At Supersavvy, AC installation starts from ₹1,200 (indicative — the final cost depends on the specific work involved). Additional costs may apply for:
New copper piping — if the old piping is too short, damaged or kinked.
New wall bracket — if the old bracket doesn’t fit the new location.
Gas recharge — if refrigerant was lost during the move (gas charging starts from ₹899, indicative).
Electrical work — if the new location needs a dedicated MCB or wiring run for the AC.
Pricing is shared transparently before work begins, so there are no surprises.
How Supersavvy can help
Supersavvy’s in-house technicians handle the full AC shifting process — uninstallation, transport coordination and reinstallation at the new location. The technician does a proper pump-down to preserve your gas, handles the piping carefully, and tests everything after reinstallation. Repairs and installation work carry a 90-day warranty, subject to the applicable terms.
To arrange AC shifting in Mumbai or any of Supersavvy’s service cities, you can read the full installation guide or schedule a visit online.
Frequently asked questions
Can I shift a window AC myself?A window AC is simpler than a split AC — it’s a single unit with no copper piping or gas recovery. You can technically remove it yourself if you’re comfortable handling the weight and electrical disconnection. However, reinstallation (fitting it into a new window frame, sealing gaps, electrical) is easier with a technician, especially if the window dimensions differ.
Will my AC need a gas recharge after shifting?Not if the pump-down is done properly during uninstallation. A good technician recovers all the refrigerant into the outdoor unit before disconnecting the pipes. If the gas was lost (due to a leak or an incomplete pump-down), a recharge will be needed — gas charging starts from ₹899 (indicative).
How long does AC shifting take?Typically 3–5 hours total: about 1–1.5 hours for uninstallation, transport time (varies), and 1.5–2.5 hours for reinstallation. New piping runs or wall drilling can add time.
Can I reuse the old copper piping?Yes, if the piping is in good condition (no kinks, no corrosion, correct length for the new location). If the new pipe run is longer, shorter by a large margin, or the old pipes are damaged, new piping is recommended. Reusing damaged pipes risks leaks and reduced efficiency.
Need an AC Today?
Buy refurbished, pre-owned, or second-hand ACs at the best rates in Mumbai.
✅ Free installation support
✅ Instant buyback available
📞 Call/WhatsApp: +91 7098110110











Navigation links
HomeAbout UsMy BookingsBlogsContact UsRaise a ComplaintComplaintsPartner AppTechnical AcademySupport ChatAll Rights Reserved ©
